Class 8
Note to Self
Turn on the video record in Zoom
Crit Assignment 1
A few words about the "crit" or critique process
Assigned: Assignment 2 “Tattoo Design”
Specs
Color in Illustrator
Two Worlds: CMYK vs RGB
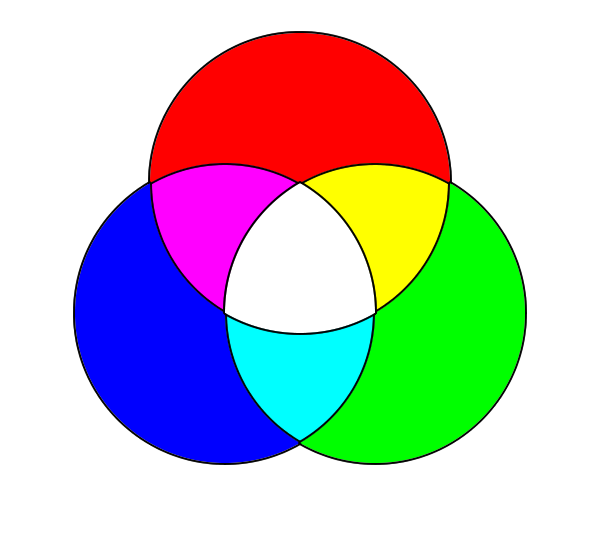
RGB
- Red/Green/Blue
- Additive, not Subtractive
- For the world of screens
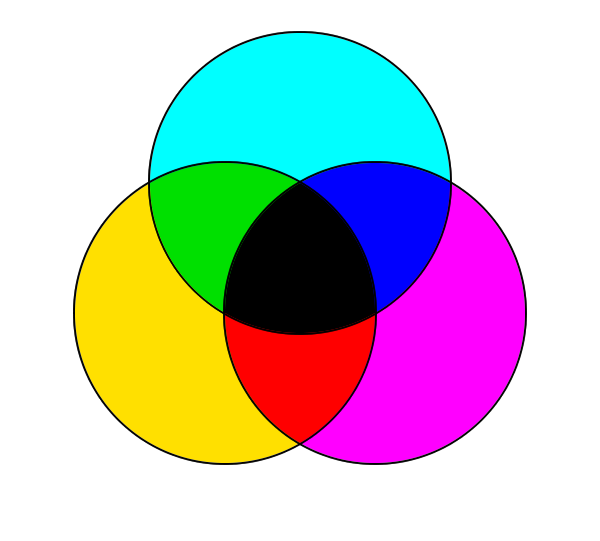
CMYK
- Cyan/Magenta/Yellow/BlacK
- Subtractive, not Additive
- Standard for printed colors
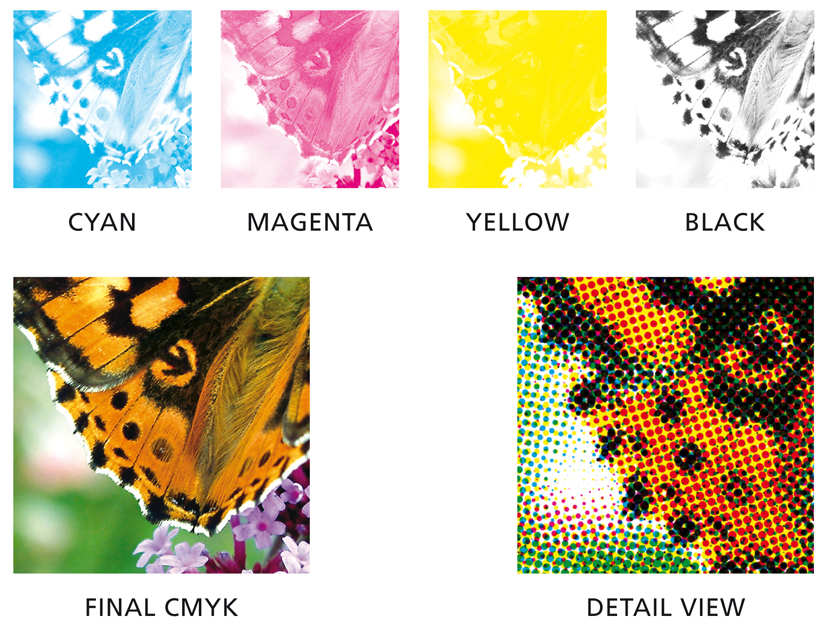
An image separated into its component cyan, yellow, magenta, and black plates

Beyond the CMYK inks, there are also solid color cans of ink in a color system called Pantone Matching System (PMS)
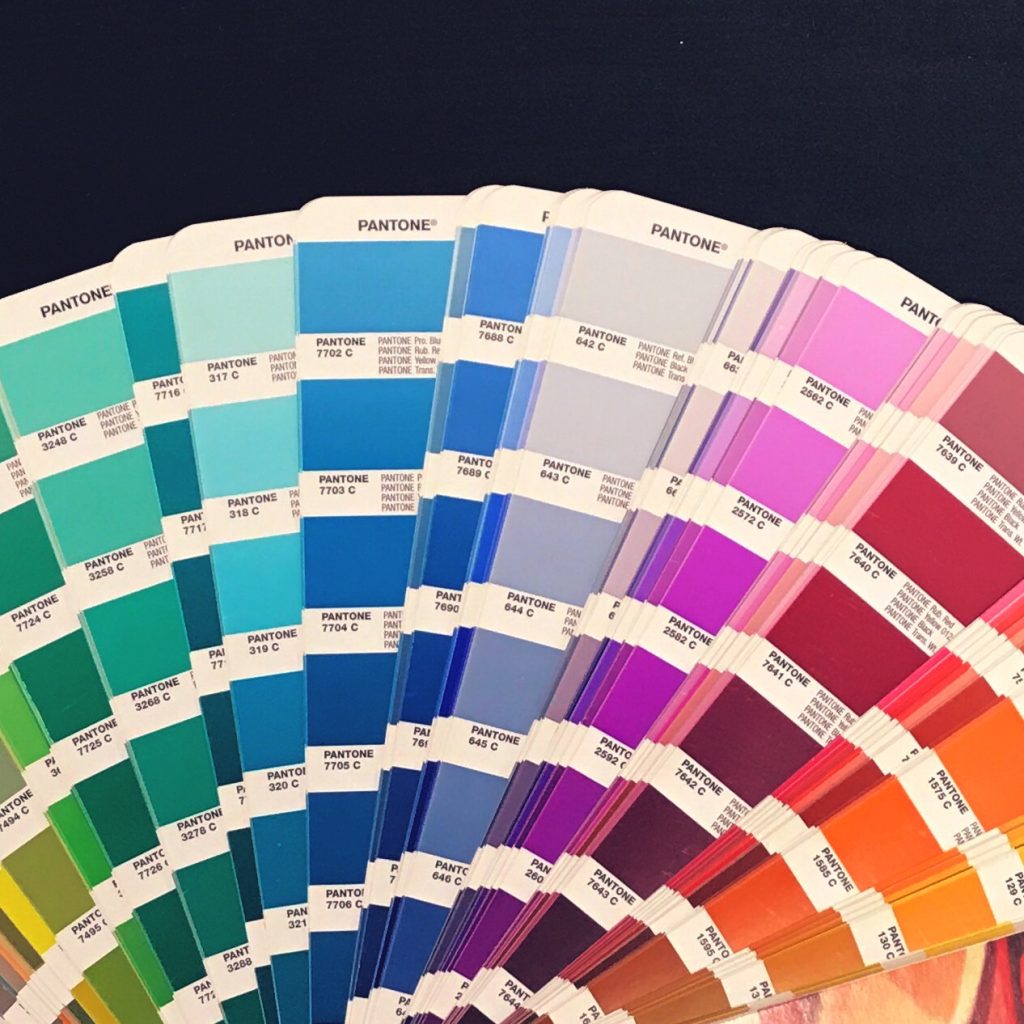
PMS colors are chosen from a color book, which also is represented in Illustrator

Our Tattoo assignment is in CMYK with PMS colors
Illustrator & CMYK Color
Let's Look Closer At The Default CMYK Swatches
CMYK represents 4 colors of ink, printed on top of each other at angles (0°, 15°, 45°, 75°) to create different colors: 

Sample file

Double-click a swatch for it's options dialog
Note the Color Type: Process Color
- The alternative is Spot Color, which is what we just talked about
Note the Color Mode: CMYK
- The sliders adjust the amount of ink of each color, Cyan, Magenta, Yellow and Black
- It's through these variations that all 4-color printed work is rendered
- You can mix and save your own...
A word about CMYK vs. Spot color and the "Global" setting
- Spot colors are Global by default
- Changing a global color will change all instances of that color in the document
How To Mix Your Own Colors
Use the Create New Swatch menu item in the Color Panel, or the Create New Swatch button in the Swatch Panel. Set the Color panel to Show Options to view sliders.


Mix with the slider (which is kind of clunky)
Mix with the rainbow thingy in the Color Panel (also kind of clunky)
Use the Color Guide (more on this next time...)
Color basics: HSB = Hue, Saturation, Brightness
- Hue: the "color" of a color, like red, blue, green, yellow
- Saturation: the "intensity" of a color, like bright red (hi saturation), dull brown (low saturation)
- Brightness (sometimes listed as "V" for Value): the amount of light or darkness in a color, like pink (light red), burgundy (dark red)
Use the H S B radio buttons to pick which color aspect you want to change in the vertical bar next to the buttons
Hue selected (in Degrees out of 360°)
Saturation selected (in percent out of 100%)
Brightness selected
Watch Out For Colors That Can't Be Printed!
The color picker will let you choose colors that can't be printed with CMYK inks. A warning icon will appear next to the color when you pick an illegal color

About Color Ranges, Or "Gamuts"

We see colors with lightwaves. When white light (which contains all colors of light - remember prisms and rainbows and Newton?) hits a red colored object, that object absorbs all the non-red colors of light and reflects only the red lightwaves. Our eyes can see a set of colors in what's called the Visible Spectrum. Certain media, like CMYK printing, can only create a limited subset of all the possible colors we can see. This subset is called a "Gamut"

When you go outside the gamut that CMYK can reproduce, Illustrator will tell you with that little ! icon

This is a graph of different gamuts
Why Does It Matter?
It matters because if you do something that looks great on-screen but is out of the CMYK gamut, you'll be really disappointed when it gets printed (and your client might refuse to pay you and you probably also get stuck with the printing bill).
Organizing Swatches


Swatches can be organized in Color Groups through the Add Color Group button
Drag a swatch to move it into a group
Watch out! Dragging from one group or the default colors moves that color without leaving a copy behind. To create a separate swatch of the same color in a group, click the swatch you want to copy, then drag if from the Color Panels color tab
Drag a color tab into a group

(make new example on the fly)

Create a new group with a selection and Add Color Group yields:

Working With The Paint Brush Tool
Makes editable paths similar to the Pen tool (demo)
The Paint Brush Vs The Pen Tool

vs.

Brushes

The Brushes Panel

Same path, different brush

Load brushes from the popup menu in the lower left of the brushes panel


Click on the above to see at full size. NOTE: Even though they're listed here, you're not allowed to use them in this class! However, you're welcome to build your own.
Brush Categories

Illustrator has five categories of brushes, which you'll see when you choose Create New Brush
from the brush panel. Each brush category has its own dialog to control its behavior.
Brush Options by Brush Type
Brush Options: Calligraphic

Calligraphic brushes are based on elliptical shapes of various sizes. You can use a graphics tablet to vary the Angle, Roundness, and/or Size of the brush based on the pressure applied to the stylus (but don't forget to set the variability or it won't work).

Brush Options: Art Brushes

Art brushes are made from existing vector graphics. Setup is fairly complicated, we'll look at some examples later in the semester.
In fact, brush design is hard. We'll cover more on custom brushes later...
Painting With Illustrator Continued
Modifying Strokes

With the Width
tool
Expanding The Paint Brush Stroke

Since the Paint Brush tool makes only strokes/paths without fills, it's often useful to turn it into an object whose outer visual boundary is a stroke and interior is a fill.

Use Menu>Object>Expand Appearance
- Why? Useful for creating Live Paint objects

Hand-drawn thing from paintbrush tool

Thing expanded into filled objects with no stroke


Thing filled with Live Paint after being converted to Live Paint object with Menu > Object > Live Paint > Make
Fun With Brushes
The Scatter Brush
For interesting effects!

13 point star, radius 1 .8 in, radius 2 .25 in. 2pt stroke. Rotate each about 18.85 degrees (360 divided by 13 divided by 2) and scale down
First, create an object, or group of objects (without gradients, brushes or other fancy stuff)

Choose New Brush from the bottom of the Brush Panel

Size: Fixed, 23%
Spacing: Random, 2% - 5%
Scatter: Random, -10% - 10%
Rotation: Random, 0° - 180°
Colorization: None
Set some settings, we can tweak latter...

The Scatter Star brush applied to a star

Scatter Star applied to a paintbrush path with pressure controlling size
Working With The Blob Tool

Blob Vs. Paint Brush

Paint Brush makes editable paths without fills and strokes defined by Brushes

Blob makes contiguous areas of color with fills and invisible strokes
The Blob Options Dialog

Double-Click the tool icon to access
- Keep Selected
- Keeps blob gestures selected. Default is off.
- Merge Only With Selection
- Off by default. If Keep Selected is off, and Merge Only is on, then each blob gesture remains a separate entity
- This and Keep Selected are the most frequently modified settings of the blob tool
- Tolerances
- No vector tool can capture every nuance of input gestures - these setting adjust how closely the tool imitates the original gesture
- Fidelity
- Higher values have less detail
- Smoothness
- Higher values do more smoothing
- Default Brush Options
- Changes the shape and size of the brush, and allows stylus pressure from a graphics tablet to control things like the size of the brush
Creating Gradients
Using the Gradient Window
Gradient Types

Linear

Radial

Linear Gradient Angle

Radial Gradient Angle and Aspect Ratio
Changing Gradient Colors
Double-click on a tab to edit a color

Click below gradient band to add a new tab, click on an existing tab and drag it off the panel to delete it.

You can adjust the position of the tabs

Adjust the center point of the point-to-point spread of the gradient

Adjust the Opacity of a color tab

And Strokes can have gradients too!
The gradient tool doesn't work with gradients in strokes, but you can use the Angle to set the stroke, or use Menu > Object > Expand with only strokes, then select the fill in the appearance panel
Using the Gradient Tool


Important Trick: Gradients with Transparency
It's easy to mess up transparency in a gradient by making the transparent color different than the solid color. They should be the same.

The right way: black to black to black gradient, with the center black at 0% opacity

The wrong way: black to white to black gradient
"Freeform" Gradients

Only 2 years old, Freeform Gradients use points and/or lines to allow customization of a gradient within a shape.
To apply a freeform gradient to a shape:
- Select the shape, then choose Menu > Window > Gradient to open the Gradient panel.
- Click icon for Freeform Gradient next to "Type:"

The Gradient tool will be selected and points will appear on the shape icon for Freeform Gradient Color Steps (the number of default points varies by shape). Each point represents a color stop in the gradient. The colors will automatically blend from point to point, point to line, and or line to line within the shape.
- To move a point within the shape, drag it.
- To set a point's color, double click it.
- To add additional points, click anywhere on the shape where there isn't currently a point.
- To remove a point, click it then press Delete on a Mac or Backspace in Windows.
- To expand or reduce the spread of the color from a point, click the point, then drag icon for Freeform Gradient Color Spread at the bottom of the dashed ring that appears around the point. The bigger the ring, the more the color spreads and vice versa.
- To make the color from a point more or less transparent, click the point then set the number by OPACITY in the Gradient panel.
Freeform gradients can also be set using lines.
- Click LINES in the Gradient panel.
- Click in the shape to set the starting point for the line.
- Click again to create another point and a line will automatically connect it to the previous point. Repeat until the line is complete. The line will automatically curve through the points.
The points in a line can be moved, added, deleted, and have their color and opacity set using the same steps as above.
Freeform gradients can be made using a combination of points and lines. Just click POINT or LINE in the gradient panel to switch between them. When finished, switch to another tool to set the gradient. To edit the gradient later, select the shape then either switch to the Gradient tool or click EDIT GRADIENT in the Gradient panel.
Creating Type on and in a Path or Shape
Two ways:

Type Tool with gesture:

Normal text cursor
- Click-release to create one continuous line of type
- Drag-release to create a rect to fill with text

Text cursor over a closed shape
- Hover near the edge of a shape
- Click when cursor changes to fill the shape with text

Text cursor over an open path
- Hover near edge of path
- Click when cursor changes to place text on the path from the location you clicked on on the path
Specialized Type Tools:


Area Type Tool

Path Type Tool
Type On Path Editing Gestures
Demo... example file
Uses very small and hard to see cursors to indicate editing mode:

Adjust Type on Path: Left Margin

Adjust Type on Path: Right Margin

Adjust Type on Path: Center Align and Flip Sides
Working With The Appearance Panel

- Changing parameters
- Adding effects
- Adding Strokes & Fills (brief coverage-things to come)
Clipping Masks
Very important feature!
- Select two or more objects
- The top object must be a closed path
- Menu > Object > Clipping Mask > Make
- You can create clipping masks for objects within clipping masks
Pattern Brush

A cool trick for precise control reviewed

Go to the preferences panel and change General > Keyboard Increment to 0.0005 (you can go as low as .0001)
Another Cool Trick for Measuring
Make a square and use it as a measuring device.
Saving appearance settings as a Graphic style
Type example
Any set of attributes you apply to an object, as seen in the Appearance Panel, can be saved as a style and applied to other objects

Select the object you want to create a style from

Click on the Create New Style button in the Graphic Styles panel

Then select the object you want to apply the style to and click on the style in the Graphic Styles panel
A practical Scatter-Brush application
Practical Scatterbrush (practical_scatterbrush.ai)

- Set Size: 52%, Spacing 52%, then use Modify > Scale: 99.9% until the overlap is perfect

Practical Pattern Brush
More here and on the web
Pattern Brush
Working With The Color Guide
Great slide shows: Everything you know about color is wrong...
I'm still trying to figure out Adobe Color Harmony Rules, but here's a few:

Color Harmonies: Analagous (source .ai file)

Color Harmonies: Complementary

Color Harmonies: Pentagram

Color Harmonies: Shades & Tints

Color Harmonies: Tetrad

Color Harmonies: Triad


